Build Your Own
This chapter describes how you may build your own device to run the agent side of MTDA. Most of the configurations presented here are basic and may be enhanced with additional electronic gadgets.
KVM
If you do not have a Single Board Computer (SBC) such as the NanoPi NEO-LTS, you may start with KVM. Instead of controlling a physical device, MTDA will spawn a virtual machine. It will provide a virtual hard disk for the operating system, a virtual USB drive to install the system from and a virtual serial port to interact.
Installing KVM on Debian
The following packages should be installed on Debian (or derivatives of Debian such as Ubuntu):
$ sudo apt install qemu-kvm
The user running the MTDA agent should be added to the kvm group:
$ sudo usermod -aG kvm $USER
Logout or reboot your PC for the group changes to take effect.
Configuring MTDA
A sample configuration is shipped with the code and may be copied to your system:
$ sudo install -m 0755 -d /etc/mtda
$ sudo install -m 0644 configs/qemu.ini /etc/mtda/config
Alternatively, get prebuilt packages for Debian as follows:
$ echo 'deb [trusted=yes] https://apt.fury.io/mtda/ /' | \
  sudo tee /etc/apt/sources.list.d/mtda.list
$ sudo apt-get update
$ sudo apt-get install mtda-kvm swtpm
Running the agent
The agent may be manually started after installing required packages and configuration files as follows:
$ sudo mtda-service -n
If prebuilt packages were installed (see above), it may be started as a systemd service instead:
$ sudo systemctl start mtda
The agent will create three disk image files on startup if they do not exist (you may create these files yourself with different sizes):
ssd.img: 16 GiB serving as primary storage
usb-shared-storage.img: 8 GiB as a mass storage that be swapped between host & target
usb-data-storage.img: an extra mass storage device
The shared storage (usb-sdmux) may be initialized as follows:
$ mtda-cli target off
$ mtda-cli storage host
$ mtda-cli storage write my-os-installer.img
You may then instruct MTDA to boot from the shared storage drive:
$ mtda-cli storage target
$ mtda-cli setenv boot-from-usb 1
$ mtda-cli target on
You may use VNC to access the emulated display (port 5900, no password).
TPM emulation
QEMU may emulate a TPM. The following steps were required for Debian-based hosts. These steps may be skipped if prebuilt packages were installed.
Add missing tpmtool in gnutls-bin
Make sure your /etc/apt/sources.list files includes deb-src entries (you
may need to uncomment entries created by the Debian/Ubuntu installer) and run
apt update to fetch the deb-src package feeds.
You will then need to pull sources of the gnutls-bin package:
$ apt-get source gnutls-bin
Amend debian/control from the gnutls sources to add libtspi-dev to
Build-Depends like so:
Source: gnutls28
Section: libs
Priority: optional
Maintainer: Ubuntu Developers <ubuntu-devel-discuss@lists.ubuntu.com>
XSBC-Original-Maintainer: Debian GnuTLS Maintainers <pkg-gnutls-maint@lists.alioth.debian.org>
Uploaders:
 Andreas Metzler <ametzler@debian.org>,
 Eric Dorland <eric@debian.org>,
 ...
Build-Depends:
 ...
 libssl-dev <!nocheck>,
 libtasn1-6-dev (>= 4.9),
 libtspi-dev,
 libunbound-dev (>= 1.5.10-1),
 libunistring-dev (>= 0.9.7),
 net-tools [!kfreebsd-i386 !kfreebsd-amd64] <!nocheck>,
 ...
and replace --without-tpm with --with-tpm in debian/rules:
...
CONFIGUREARGS = \
        --enable-ld-version-script --enable-cxx \
        --disable-rpath \
        --enable-libdane --with-tpm \
        --enable-openssl-compatibility \
        --disable-silent-rules \
        ...
You will then need to install the build dependencies:
$ sudo mk-build-deps -i -r
and build the modified package:
$ dpkg-buildpackage -b -uc -us
You may now check if the gnutls-bin package includes tpmtool:
$ dpkg-deb -c gnutls-bin_*_amd64.deb |grep tpmtool
-rwxr-xr-x root/root    178040 2020-06-15 17:10 ./usr/bin/tpmtool
-rw-r--r-- root/root      2322 2020-06-15 17:10 ./usr/share/man/man1/tpmtool.1.gz
and install the updated packages:
$ sudo dpkg -i gnutls-bin_*_amd64.deb libgnutls-dane0_*_amd64.deb libgnutls30_*_amd64.deb
(Reading database ... 81477 files and directories currently installed.)
Preparing to unpack gnutls-bin_3.6.13-2ubuntu1.2_amd64.deb ...
Unpacking gnutls-bin (3.6.13-2ubuntu1.2) over (3.6.13-2ubuntu1.2) ...
Preparing to unpack libgnutls-dane0_3.6.13-2ubuntu1.2_amd64.deb ...
Unpacking libgnutls-dane0:amd64 (3.6.13-2ubuntu1.2) over (3.6.13-2ubuntu1.2) ...
Preparing to unpack libgnutls30_3.6.13-2ubuntu1.2_amd64.deb ...
Unpacking libgnutls30:amd64 (3.6.13-2ubuntu1.2) over (3.6.13-2ubuntu1) ...
Setting up libgnutls30:amd64 (3.6.13-2ubuntu1.2) ...
Setting up libgnutls-dane0:amd64 (3.6.13-2ubuntu1.2) ...
Setting up gnutls-bin (3.6.13-2ubuntu1.2) ...
Processing triggers for man-db (2.9.1-1) ...
Processing triggers for libc-bin (2.31-0ubuntu9) ...
Raspberry Pi 4 Model B
The Raspberry Pi 4 Model B (“Pi 4”) is a powerful, open-source, single-board computer developed by the Raspberry Pi Foundation for a wide range of computing applications.
It is equipped with multiple connectivity options, including Gigabit Ethernet, Wi-Fi (802.11ac), Bluetooth 5.0, and supports dual 4K display outputs via micro HDMI ports. Additionally, the Pi 4 has two USB 3.0 ports, two USB 2.0 ports, and a USB-C power input.
Debian (bookworm) will be loaded on the microSD card and will include the MTDA agent. It will communicate with its clients over Ethernet. An electric relay will be controlled via USB to drive power for our Device Under Test. Communication with that device will be achieved via the USB OTG port where the following functions will be exposed:
ACM: provide a Serial over USB port. The Operating System running on the Device Under Test may use this virtual serial port to provide a login shell to MTDA clients.
HID: the Raspberry Pi will be seen as a keyboard. This may be used by e.g.
power onscripts to enter the firmware of the Device Under Test to select a boot media (SSD or USB).Mass Storage: a USB stick will be connected to the USB Host available on the Raspberry Pi and will be exposed to the Device Under Test. MTDA will allow clients to write a new OS image for the device it is connected to.
Building the microSD card image
Use kas-container to build a Debian image for the Raspberry Pi 4 with MTDA
preinstalled:
$ ./kas-container build kas/debian/mtda-rpi4b.yml
Insert a microSD card to your system and write the generated image:
# Check the microSD card device, /dev/mmcblk0 is used as an example
$ sudo dd if=build/tmp/deploy/images/rpi4b/mtda-image-*.wic \
  of=/dev/mmcblk0 bs=8M
(replace /dev/mmcblk0 with the actual SD card device on your system).
Applying external power
The Raspberry Pi 4 Model B usually gets powered over its USB-Type C interface. Since we will attach this port to the Device Under Test, we need to apply external power instead. Re-purpose a USB cable and connect its red wire to #2 (5V IN) and its black wire to #6 (GND).
Booting the Raspberry Pi 4 Model B
Insert the microSD card created above into the microSD card slot of your Raspberry
Pi 4 Model B and connect the board to your network. Attach a formatted USB stick to
the USB-Host port. Lastly, get a Type C USB cable, connect your system and the
Raspberry Pi. The red LED of the Raspberry Pi should light up as well as the LEDs from
the RJ45 port. Your system should detect a mass storage after the Raspberry Pi has
booted. A new serial port and keyboard should also be detected. You may also
check that your Raspberry Pi has obtained an IP address. Use ssh to connect (use
mtda as both login and password).
Attaching an electric relay
We will use a 5V relay such as the JQC3F-05VDC pictured below:
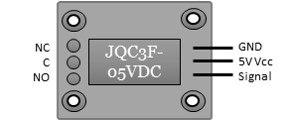
It requires a 5V line, ground and signal. Here is the pin-out of our Raspberry Pi 4 Model B:
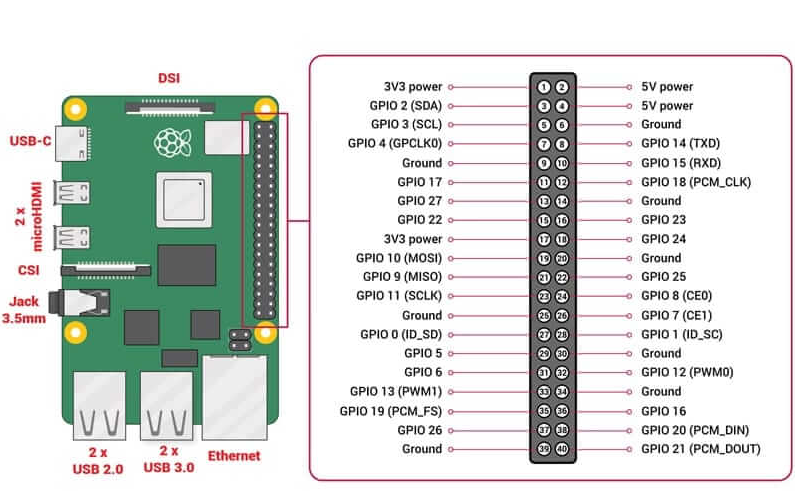
We will use pin #4 (5V OUT) to deliver 5V to the relay, pin #9 (GND) to connect the relay to ground and pin #11 to drive the relay. It should be noted that the signal GPIO pin is seen as GPIO 529 in Linux.
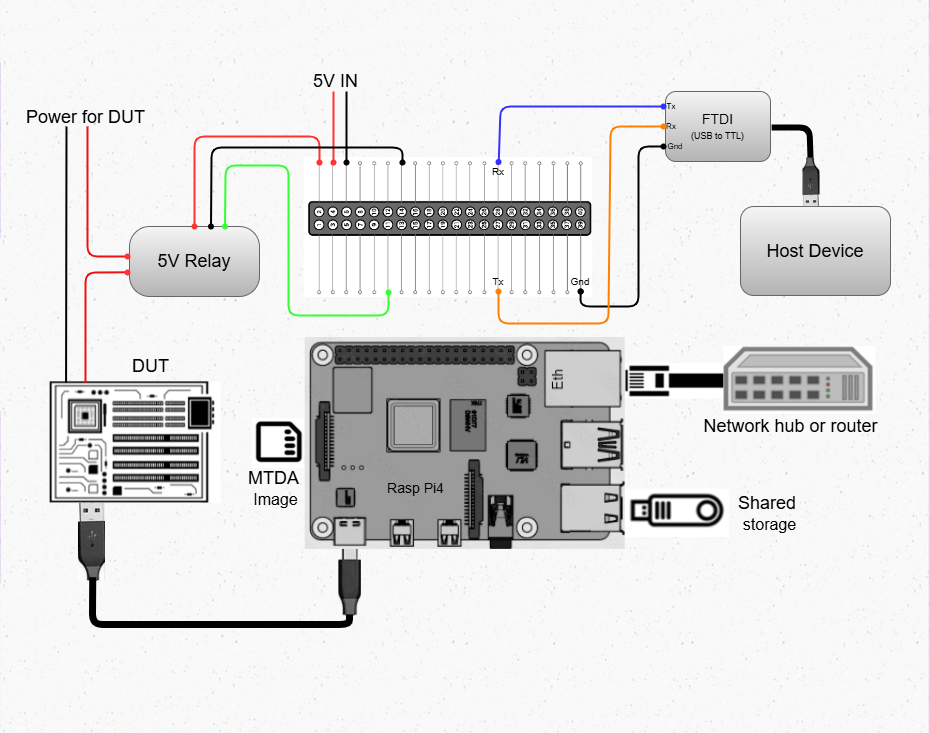
Stitching It All Together
The following diagram shows the various connections described above:
Configuring MTDA
A configuration file should be created on the Raspberry Pi 4 Model B. Use ssh to
connect with the mtda user and then sudo to get elevated privileges:
$ ssh mtda@172.17.0.2
The authenticity of host '172.17.0.2 (172.17.0.2)' can't be established.
ECDSA key fingerprint is SHA256:X4hTqfSmfG1bet2Bg/MfU1fNMgp30T+6SkAwLXZbJTQ.
Are you sure you want to continue connecting (yes/no/[fingerprint])? yes
Warning: Permanently added '172.17.0.2' (ECDSA) to the list of known hosts.
mtda@172.17.0.2's password: mtda
Linux mtda 4.19.0-11-armmp #1 SMP Debian 4.19.146-1 (2020-09-17) armv7l

The programs included with the Debian GNU/Linux system are free software;
the exact distribution terms for each program are described in the
individual files in /usr/share/doc/*/copyright.

Debian GNU/Linux comes with ABSOLUTELY NO WARRANTY, to the extent
permitted by applicable law.
Last login: Sun Sep 27 18:40:42 2020 from 172.17.0.100
$ sudo -s
[sudo] password for mtda: mtda
#
Use vi to create an initial configuration:
# vi /etc/mtda/config
Hit i to enter the input mode and type the following configuration:
[console]
variant=usbf

[power]
variant=gpio
gpio=gpiochip0@529

[keyboard]
variant=hid
device=/dev/hidg0

[storage]
variant=usbf
file=/dev/sda
Hit ESC to leave the input mode and type :x to exit. You should be back
to the shell and may restart the agent:
# sync
# systemctl restart mtda
Clients may now connect to the MTDA agent, control the power input of the Device Under Test and remotely access its console.
NanoPi NEO-LTS
The NanoPi NEO (abbreviated as NEO) is another fun board developed by FriendlyARM for makers, hobbyists and fans.
It is powered by an Allwinner H3 (Cortex A7), has a microSD slot, a microUSB OTG port, a USB-Host Type A port, an Ethernet port and GPIO pins.
Debian (bookworm) will be loaded on the microSD card and will include the MTDA agent. It will communicate with its clients over Ethernet. An electric relay will be controlled via a GPIO line in order to drive power for our Device Under Test. Communication with that device will be achieved via the USB OTG port where the following functions will be exposed:
ACM: provide a Serial over USB port. The Operating System running on the Device Under Test may use this virtual serial port to provide a login shell to MTDA clients.
HID: the NanoPi NEO-LTS will be seen as a keyboard. This may be used by e.g.
power onscripts to enter the firmware of the Device Under Test to select a boot media (SSD or USB).Mass Storage: a USB stick will be connected to the USB Host available on the NanoPi NEO-LTS and will be exposed to the Device Under Test. MTDA will allow clients to write a new OS image for the device it is connected to.
Building the microSD card image
Use kas-container to build a Debian image for the NanoPi NEO-LTS with MTDA
preinstalled:
$ ./kas-container build kas/debian/mtda-nanopi-neo.yml
Insert a microSD card to your system and write the generated image:
# Check the microSD card device, /dev/mmcblk0 is used as an example
$ sudo dd if=build/tmp/deploy/images/nanopi-neo/mtda-image-*.wic \
  of=/dev/mmcblk0 bs=8M
(replace /dev/mmcblk0 with the actual SD card device on your system).
Applying external power
The NanoPi NEO-LTS usually gets powered over its USB-OTG interface. Since we will attach this port to the Device Under Test, we need to apply external power instead. Re-purpose a USB cable and connect its red wire to #2 (5V IN) and its black wire to #6 (GND).
Booting the NanoPi NEO-LTS
Insert the microSD card created above into the microSD card slot of your NanoPi
NEO-LTS and connect the board to your network. Attach a formatted USB stick to
the USB-Host port. Lastly, get a microUSB cable, connect your system and the
NEO together. The red LED of the NEO should light up as well as the LEDs from
the RJ45 port. Your system should detect a mass storage after the NEO has
booted. A new serial port and keyboard should also be detected. You may also
check that your NEO has obtained an IP address. Use ssh to connect (use
mtda as both login and password).
Attaching an electric relay
We will use a 5V relay such as the JQC3F-05VDC pictured below:
It requires a 5V line, ground and signal. Here is the pin-out of our NanoPi NEO-LTS:
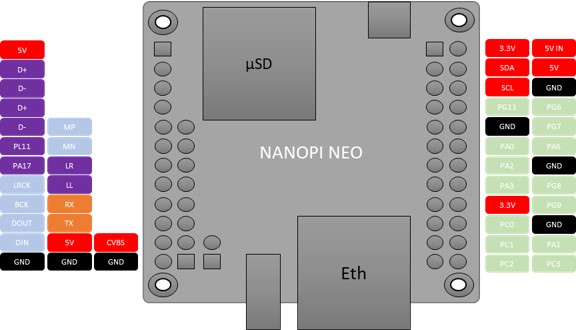
We will use pin #4 (5V OUT) to deliver 5V to the relay, pin #9 (GND) to
connect the relay to ground and pin #7 (PG11) to drive the relay. It should
be noted that the signal GPIO pin is seen as GPIO 203 in Linux.
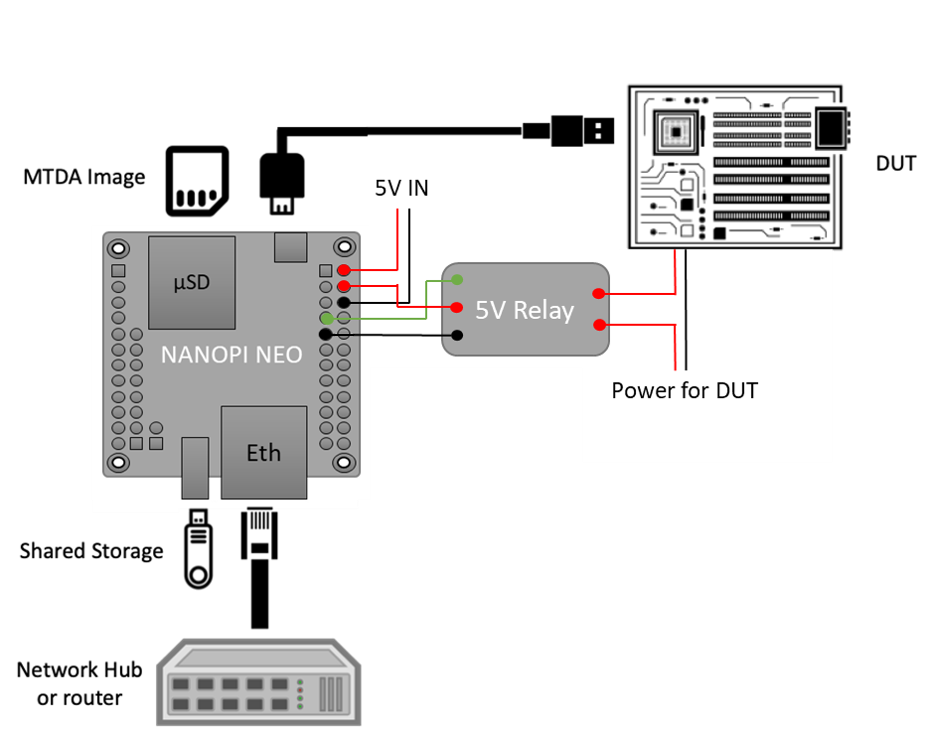
Stitching It All Together
The following diagram shows the various connections described above:
Configuring MTDA
A configuration file should be created on the NanoPi NEO-LTS. Use ssh to
connect with the mtda user and then sudo to get elevated privileges:
$ ssh mtda@172.17.0.2
The authenticity of host '172.17.0.2 (172.17.0.2)' can't be established.
ECDSA key fingerprint is SHA256:X4hTqfSmfG1bet2Bg/MfU1fNMgp30T+6SkAwLXZbJTQ.
Are you sure you want to continue connecting (yes/no/[fingerprint])? yes
Warning: Permanently added '172.17.0.2' (ECDSA) to the list of known hosts.
mtda@172.17.0.2's password: mtda
Linux mtda 4.19.0-11-armmp #1 SMP Debian 4.19.146-1 (2020-09-17) armv7l

The programs included with the Debian GNU/Linux system are free software;
the exact distribution terms for each program are described in the
individual files in /usr/share/doc/*/copyright.

Debian GNU/Linux comes with ABSOLUTELY NO WARRANTY, to the extent
permitted by applicable law.
Last login: Sun Sep 27 18:40:42 2020 from 172.17.0.100
$ sudo -s
[sudo] password for mtda: mtda
#
Use vi to create an initial configuration:
# vi /etc/mtda/config
Hit i to enter the input mode and type the following configuration:
[console]
variant=usbf

[power]
variant=gpio
gpio=gpiochip0@203

[keyboard]
variant=hid
device=/dev/hidg0

[storage]
variant=usbf
file=/dev/sda
Hit ESC to leave the input mode and type :x to exit. You should be back
to the shell and may restart the agent:
# sync
# systemctl restart mtda
Clients may now connect to the MTDA agent, control the power input of the Device Under Test and remotely access its console.
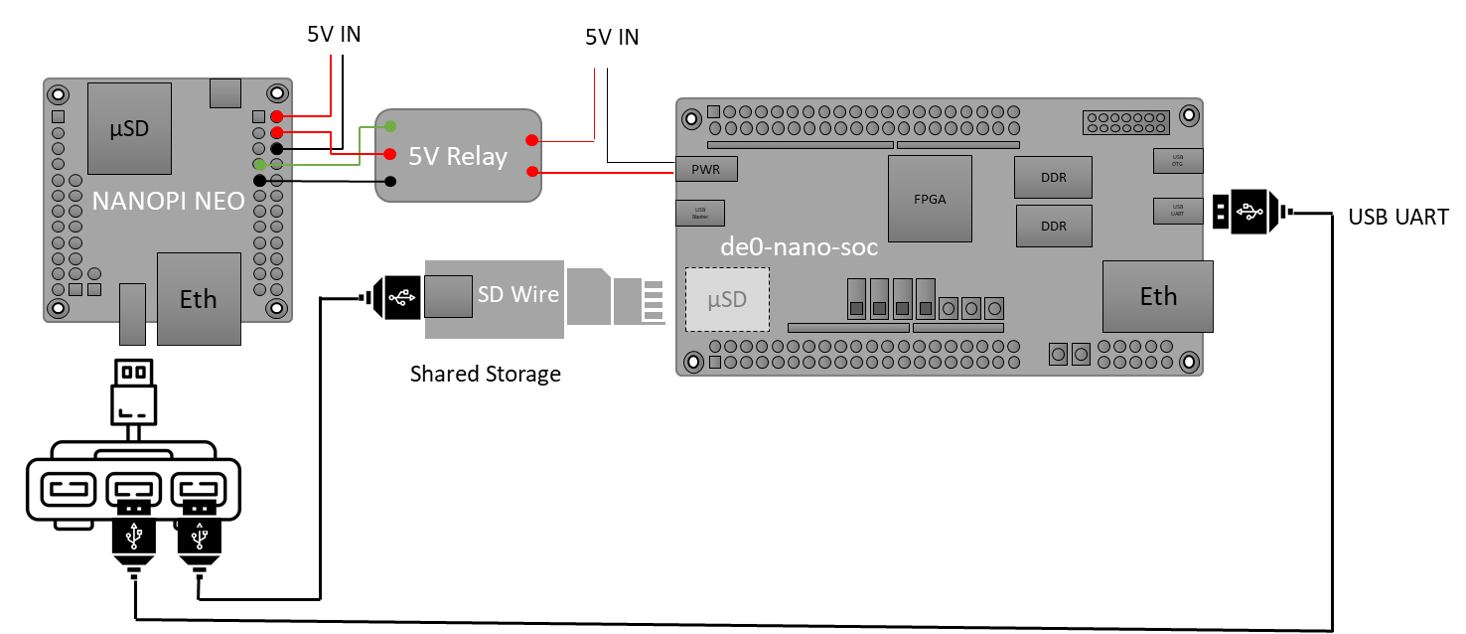
Variant
Boards booting from a SD card instead of a USB stick may use Tizen’s SDWire to share the microSD card between the host and device under test. A sample setup using Terasic’s DE0-Nano-SoC Development Kit is shown below:
The SDWire PCB may be built using the PCB fabrication files found on the Tizen Wiki (https://wiki.tizen.org/SDWire).
The MTDA image built above already includes the sd-mux-ctrl tool
and the MTDA samsung driver that supports both SDWire but also the older
SD-MUX design.
The following configuration file may be used for the DE0-Nano-SoC:
[main]
debug=0

[console]
variant=serial
port=/dev/ttyUSB0
rate=115200

[power]
variant=gpio
gpio=gpiochip0@203

[storage]
variant=samsung
serial=sdwire1
device=/dev/sda
where sdwire1 is the serial number programmed into the SDWire EEPROM. Use
sd-mux-ctrl -l to list SDWire devices connected to your NanoPi NEO and
obtain their serial number.