Integrate with
HomeKit
Introduction
HomeKit is a smart home system to control appliances. MTDA may advertise itself as a HomeKit compatible (but not certified) device to let users turn test devices ON or OFF using Apple’s Home application or its assistant (Siri).
Configuration
Add the following configuration block to your MTDA configuration file:
[assistant]
variant=homekit
name=MyDevice
port=32768
where name is the user-friendly name to be advertise on the network and
port the network port to listen on.
Setup
Use the IOS Home application to register your MTDA device as an accessory
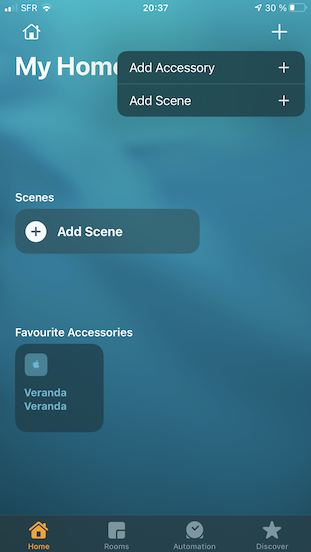
Proceed without a QR code by tapping on I Don't have a Code or Cannot Scan
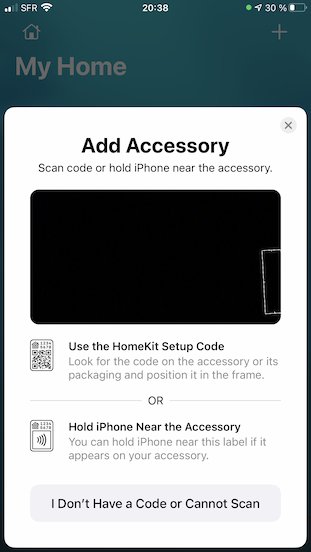
The requested code may be retrieved using the getenv command provided by
mtda-cli:
$ mtda-cli -r my-mtda-device.lan getenv homekit-setup-code
534-60-652
where my-mtda-device.lan is the name or IP address of the device running
the MTDA service. To finalize the setup of your MTDA device, tell Home
where it sits and give it a name. It is recommended to display our MTDA device
as a Power Point.
The Home application should now have an outlet icon for your MTDA and show its
status. Tapping on the icon will toggle power for the device attached to MTDA.
LAVA
Introduction
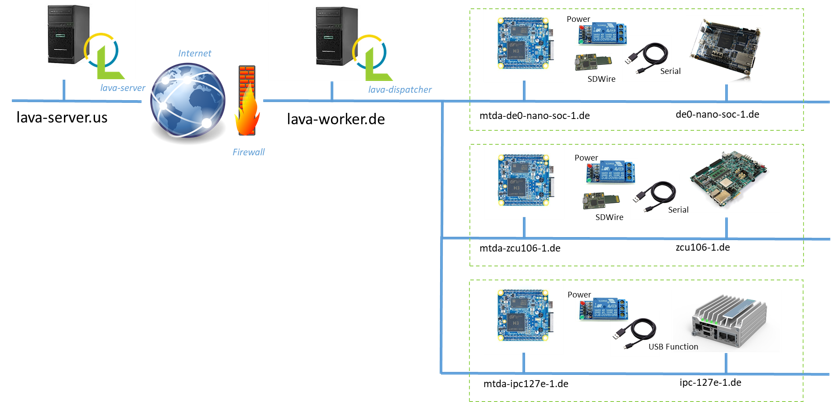
LAVA is a continuous integration platform for deploying and testing operating systems onto physical and virtual hardware. It needs methods to power targets, write system images and interact with the system (usually over a serial console). These mechanics can be provided/abstracted by MTDA. A sample deployment is shown below:
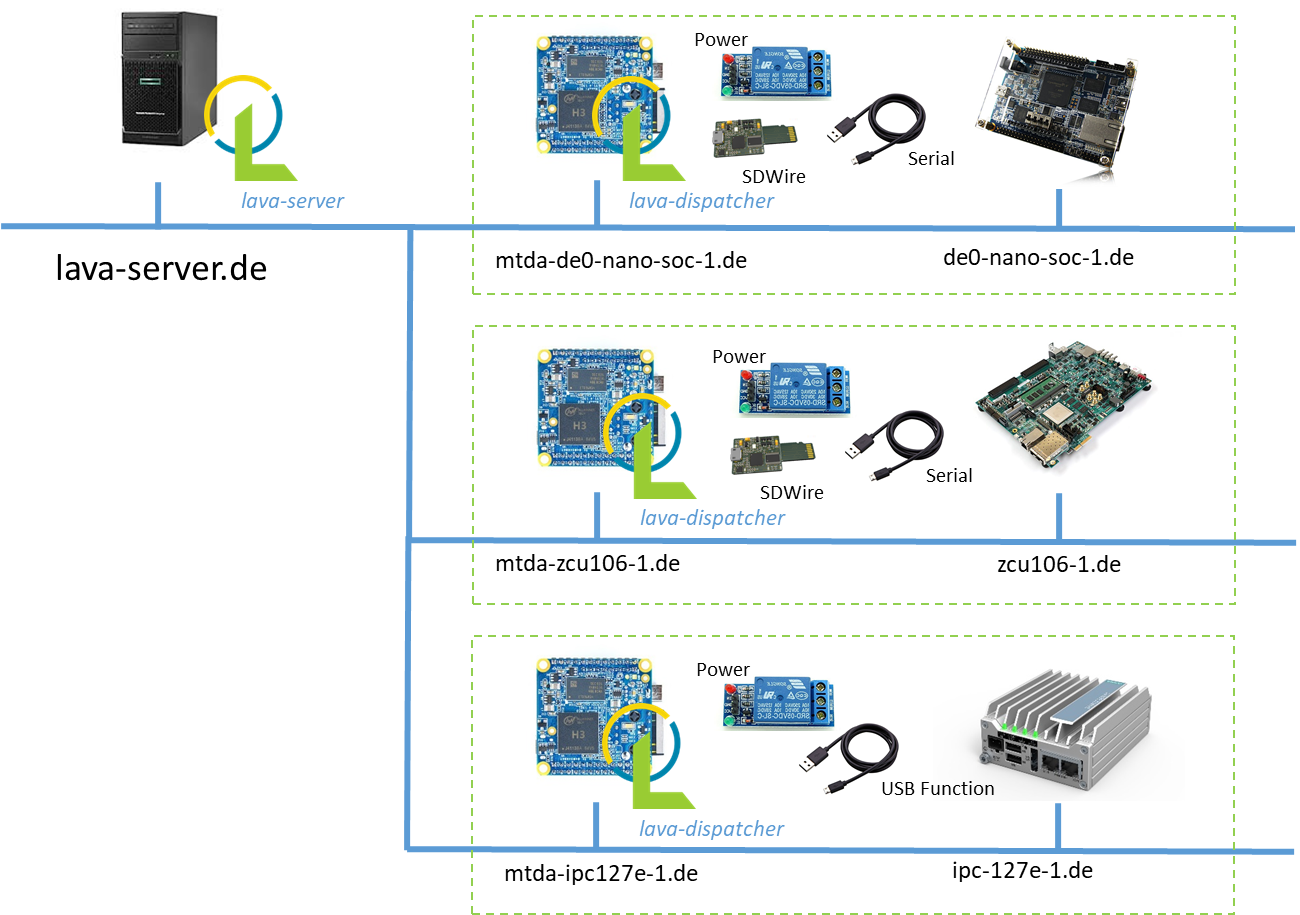
This section provides some guidance to install LAVA and configure it to interact with MTDA agents. Please refer to the LAVA documentation for details or for more advanced configuration.
Install on Debian
A LAVA instance may be installed on Debian with apt:
$ sudo apt install -y lava
Create /etc/lava-server/settings.conf with the following settings for a
simple installation:
"ALLOWED_HOSTS": ["infra-lava.lan"]
"CSRF_COOKIE_SECURE": false
"SESSION_COOKIE_SECURE": false
Replace infra-lava.lan with the network name of your Debian server. A super
user should be created:
$ sudo lava-server manage createsuperuser --username john --email=john@foo.com
The web interface should be enabled with:
$ sudo a2dissite 000-default
$ sudo a2enmod proxy
$ sudo a2enmod proxy_http
$ sudo a2ensite lava-server.conf
$ sudo service apache2 restart
$ sudo service lava-server-gunicorn restart
Check whether lava-server is running:
$ sudo systemctl status lava-server-gunicorn
Access the web interface with the following URL in the browser:
http://infra-lava.lan
Sign in to your account with the created superuser. Login should be successful.
Attach to lava-server
The sample NanoPi NEO image may be rebuilt with the lava-dispatcher package
preinstalled using the optional lava.yml fragment when building with kas:
$ ./kas-container build kas/debian/mtda-nanopi-neo.yml:kas/opt/lava.yml
It is also possible to install that package using apt install. Once the new image has been deployed (or required packages installed manually), create a worker on the lava-server web interface through:
Administration -> Lava Scheduler App -> Worker (Add)
Add hostname and dispatcher version details as shown below:
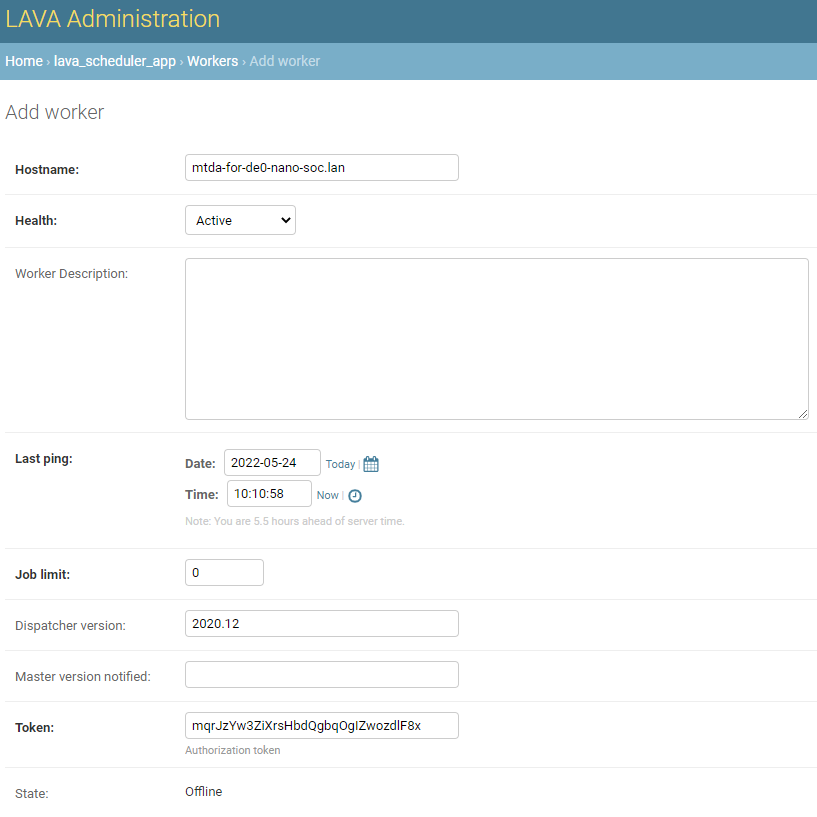
It should be noted that token value is automatically generated when adding the worker. You need to copy this token key and add it to worker configuration.
Use vi to edit /etc/lava-dispatcher/lava-worker:
$ sudo vi /etc/lava-dispatcher/lava-worker
and set the following variables to match your network:
URL="http://infra-lava.lan"
LOGLEVEL="DEBUG"
HOSTNAME="--hostname mtda-for-de0-nano-soc.lan"
TOKEN="--token mqrJzYw3ZiXrsHbdQgbqOgIZwozdlF8x"
Replace mtda-for-de0-nano-soc.lan with the network name of the worker, along
with token mqrJzYw3ZiXrsHbdQgbqOgIZwozdlF8x with the generated token.
The service should be restarted:
$ sudo systemctl restart lava-worker
Check whether lava-worker is running:
$ sudo systemctl status lava-worker
Verify in the lava-server web interface UI whether the created lava-worker is status is listed as online.
Device support
A mtda device type may be added to your LAVA installation and used as a
base for devices added to your LAVA instance. Create
/etc/lava-server/dispatcher-config/device-types/mtda.jinja2 as follows:
{# device_type: mtda #}
{% extends 'base.jinja2' %}

{% set def_mtda_agent = 'localhost' %}
{% set mtda_cli = 'mtda-cli -r ' ~ mtda_agent|default(def_mtda_agent) %}

{% set connection_command = mtda_cli ~ ' console raw' %}
{% set power_off_command = mtda_cli ~ ' target off' %}
{% set power_on_command = mtda_cli ~ ' target on' %}
{% set hard_reset_command = mtda_cli ~ ' target reset' %}

{% set def_mtda_deploy_cmds = [mtda_cli ~ ' target off',
                               mtda_cli ~ ' storage host',
                               mtda_cli ~ ' storage write "{IMAGE}"',
                               mtda_cli ~ ' storage target'] %}

{% block body %}
actions:
  deploy:
    methods:
      flasher:
        commands: {{ mtda_deploy_cmds|default(def_mtda_deploy_cmds) }}
  boot:
    connections:
      serial:
    methods:
      minimal:
{% endblock body %}

{% block timeouts %}
timeouts:
  actions:
    bootloader-retry:
      minutes: 2
    bootloader-interrupt:
      minutes: 5
    bootloader-commands:
      minutes: 5
  connections:
    bootloader-retry:
      minutes: 2
    bootloader-interrupt:
      minutes: 5
    bootloader-commands:
      minutes: 5
{% endblock timeouts %}
The mtda device type needs to be registered as follows:
$ sudo lava-server manage device-types add mtda
Register devices
A Jinja file for your test device needs to be created in
/etc/lava-server/dispatcher-config/devices/ with the following contents:
{% extends 'mtda.jinja2' %}
{% set mtda_agent = 'mtda-for-de0-nano-soc.lan' %}
where mtda-for-de0-nano-soc.lan is the name of the host running the MTDA agent
and being physically connected to the device to be tested. The file should be
named <device>.jinja2 where <device> is the name of your device (e.g.
de0-nano-soc1).
Once created, the device needs to be registered:
$ lava-server manage devices add \
      --device-type mtda \
      --worker mtda-for-de0-nano-soc.lan \
      de0-nano-soc1
It should be noted that while MTDA agent images include lava-dispatcher,
you may choose to use a separate worker (mtda-cli needs to be installed)
to get more adequate storage (test images are downloaded on the worker) and/or
more compute power as depicted below:
Change the --worker option to use this intermediate node instead of the
MTDA agent.
Context variables
LAVA jobs may override variables from device or device-type dictionaries. By
default, only white-listed variables (about a dozen options for qemu machines
and a dozen miscellaneous options) may be added to the context dictionary.
Additional keywords may be added to the schema by adding the following line
to /etc/lava-server/settings.conf:
"EXTRA_CONTEXT_VARIABLES": ["mtda_agent"]
The LAVA server will require a restart for these changes to take effect (it
will otherwise refuse to validate job definitions having MTDA options listed
under the context clause.
pytest
Introduction
The pytest framework makes it easy to write tests in Python and exercise your
software stack. MTDA provides support classes to interact with your device
and verify its functions using a suite of pytest units. MTDA API tests found
in the tests folder may be used as examples.
Test Fixtures
Test fixtures initialize test functions and provide a fixed baseline so that
tests execute reliably and produce consistent, repeatable, results. Tests
may specify the test conditions they expect by naming the fixture they expect
as argument. In order to share fixtures between tests, a conftest.py file
may be created within your tests folder. Fixtures are regular Python
functions that are decorated with @pytest.fixture.
A sample conftest.py file is provided below. It defines two simple test
fixtures: powered_off and powered_on:
import pytest

from mtda.pytest import Target
from mtda.pytest import Test


@pytest.fixture()
def powered_off():
    Test.setup()
    assert Target.off() is True

    yield "powered off"

    Test.teardown()


@pytest.fixture()
def powered_on():
    Test.setup()
    assert Target.on() is True

    yield "powered on"

    Test.teardown()
Statements before the yield keyword are setup statements (i.e. what needs
to be done before a test is executed) and statements that are following will
tear the test down.
The setup phase requires a connection to the (remote) MTDA service and will
be achieved with Test.setup(). In addition to creating a MTDA session,
this will also make pytest receive console and monitor messages on the stdout
stream (which is captured by pytest). That console will be unmuted and muted
respectively by the setup and teardown methods to capture output
from the device only while tests are running.
Additional fixtures may be created in order to e.g. get a shell prompt, get the device connected to the network, programmatically attach USB devices, etc.
Writing tests
Test units may be created in the tests folder and their name prefixed
with test_ for pytest to auto-discover your tests. The name of the unit
should denote the area being tested; e.g. test_network.py for networking
tests.
Tests are functions within the unit and also prefixed with test_. Tests
should specify the test fixture they require as argument. The following
example shows how to check if a login prompt is offered after the test device
is powered on:
from mtda.pytest import Console
from mtda.pytest import Target


def test_console_wait_for(powered_off):
    # Power on and wait for login prompt
    # with a timeout of 5 minutes
    assert Target.on() is True
    assert Console.wait_for("login:", timeout=5*60) is not None
This sample test uses the powered_off fixture created above to make sure
the test is started with the device off. It is then turned on with
Target.on and we then expect login: to be printed on the console.
MTDA client APIs may be used to write more complex tests.